Ultimate Shrinky Dink Instructions
This page may contain affiliate links. Learn More.
Use this Ultimate Shrinky Dink Instructions guide to make the most out of every shrinky dink project you make!
From materials and tips to advanced ideas and troubleshooting, you can make the most out of every sheet.
Shrinky Dinks are a fun and nostalgic craft that has stood the test of time. Originally introduced in the 1970s, these magical sheets of plastic can be drawn on, cut out, and then baked to shrink to about a third of their original size. They become thicker, smaller, and more vibrant in color, making them perfect for keychains, charms, ornaments, pins, and other custom creations.
Whether you’re crafting with kids or using them for a professional-looking DIY project, Shrinky Dinks offer endless creativity and satisfaction.
Understanding How Shrinky Dinks Work
Originally, Shrinky Dinks were sold as kits with pre-printed designs, but now there are various types of shrink plastic available: clear, frosted, white, inkjet printable, and even glow-in-the-dark or colored sheets. You can draw your own designs or print them out, then cut, color, bake, and enjoy a miniature version of your artwork. The shrinking process also intensifies the colors, giving your finished piece a vibrant, polished appearance.
To create Shrinky Dinks, you don’t need a lot of specialized supplies, which makes this an easy and accessible craft for all ages. Here’s what you’ll need:
- Shrinky Dink sheets (available in various finishes like frosted, clear, white, and inkjet)
- Shrinky Dink colors: Permanent markers, colored pencils, or inkjet printer (depending on the type of plastic)
- Scissors or craft knife
- Hole punch (if making charms, keychains, or ornaments)
- Baking sheet
- Parchment paper or non-stick aluminum foil
- Oven or toaster oven (no microwave)
- Optional: tweezers, acrylic sealer, jump rings, keychains, glue, magnets, jewelry findings

Choosing the Right Shrinky Dink Sheets
There are different kinds of shrink plastic available, and choosing the right one is key to success. Clear and frosted sheets are ideal for tracing designs and using permanent markers or colored pencils.
White sheets work well for opaque projects where you want bold color without transparency. Inkjet printable sheets are designed to go through your home printer, allowing you to print full-color images and photographs. Be sure to follow the instructions specific to the type of plastic you purchase, especially when it comes to coloring and baking.
Designing Your Shrinky Dinks
Before you start, remember that your design will shrink to about 1/3 of its original size and become 9 times thicker. Keep this in mind when choosing your design’s level of detail and size. If you’re drawing by hand, use a pencil to sketch out your design, then color it in with permanent markers or colored pencils.
For printed designs, use graphic software or a photo editing app to resize your images. A general rule is to make your design about 3 times the size you want the finished product to be. Always test your shrink ratio with a scrap piece if you’re unsure.

Coloring Tips for the Best Results
The way you color your Shrinky Dinks affects how they look after baking. For frosted or sanded sheets, colored pencils work beautifully. Just remember to color boldly, as the colors will intensify but darken during baking. For clear sheets, permanent markers like Sharpies are best.
Use multiple layers of color for depth, and let each layer dry before adding more. Avoid washable markers or water-based inks, as they may smear or fade. If using inkjet printable plastic, print using the highest quality setting, let it dry completely and avoid smudging with your fingers.

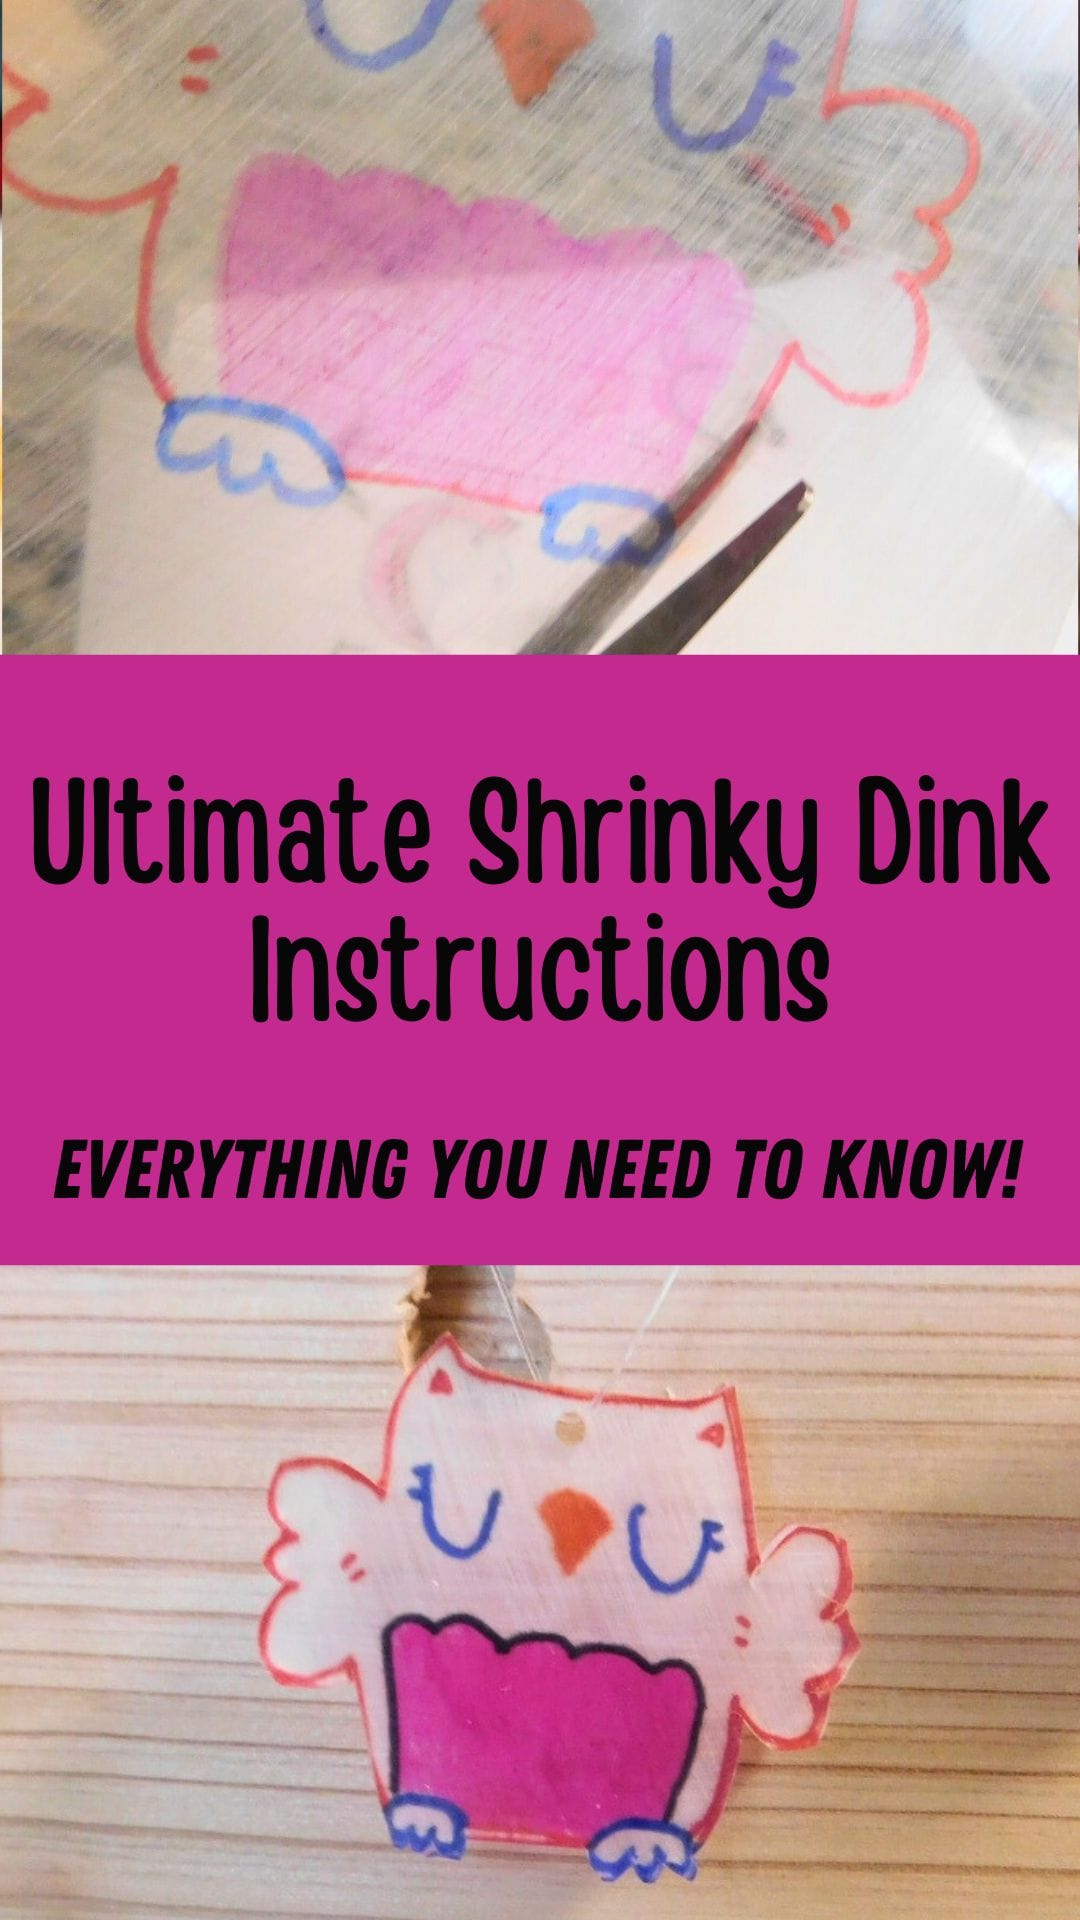
Cutting Out Your Designs
Once your design is ready and colored, cut it out carefully. Use sharp scissors for simple shapes, or a craft knife for more detailed edges. Rounded corners are preferable since sharp points can curl up too much or break after shrinking. They can also make your design uncomfortable to wear as jewelry or a keychain as it may be sharp.
If you’re planning to make your Shrinky Dink into a charm, pendant, or ornament, don’t forget to punch a hole in it before baking, this cannot be done afterward without a drill and you will risk breaking your project. A standard hole punch works well and shrinks to just the right size for a jump ring if you punch it before baking.
Shrinky Dink Temperature
Preheat your oven or toaster oven to 325°F (163°C), or follow the temperature on your specific plastic’s instructions. Line a baking sheet with parchment paper or non-stick foil. Place your cut-out pieces colored side up on the sheet, spaced out to avoid sticking. If your piece is curling too much during baking, placing another piece of parchment paper on top can help keep it flatter.
There is also a small window of time to flatten your Shrinky Dink with a spatula right after it comes out of the oven. On a rare occasion, we have had our edges touch and stick together. We just immediately pulled them out and pulled them apart carefully with spatulas (they are hot), flattened them and then put them back in the oven.

How to Bake Shrinky Dinks
Watching Shrinky Dinks in the oven is part of the fun! In just a few minutes, usually 1 to 3, they begin to curl, twist, and then flatten as they shrink. It may look like your creation is folding into a mess, but don’t worry this is normal.
Eventually, it will settle into a flat piece. Once it has stopped moving and lies flat, let it bake for another 30 seconds. Remove the baking sheet from the oven carefully. Let the pieces cool completely before handling, or press them gently flat using a spatula or smooth object while still warm if needed.
Sealing and Finishing Your Projects
Sealing your Shrinky Dinks can help preserve the color and give them a glossy or matte finish. Use a clear acrylic spray sealer (like Krylon or Mod Podge spray) and apply it in a well-ventilated area. Spray lightly in thin, even coats and allow to dry completely.
For jewelry or keychains, add jump rings, earring hooks, or keychain hardware. You can also glue magnets or pins to the backs of your creations to make fun accessories or fridge decor.
Creative Shrinky Dink Project Ideas
Shrinky Dinks aren’t just for kids. They can be used to make all kinds of creative and even professional-looking items. Here are a few ideas to get you started:
- Keychains: Add names, quotes, or characters for personalized gifts. Try these handprint keychains that make great gifts!
- Jewelry: Make custom earrings, pendants, or charms for bracelets. Try these fun 4th of July themed Shrinky Dink patterns.
- Ornaments: Create Christmas-themed designs to hang on the tree.
- Magnets: Decorate your fridge with custom doodles and art. Try these fun St. Patrick’s Day themed designs.
- Bag tags: Add Shrinky Dinks to backpacks or lunchboxes with names and fun icons. Try these fun Halloween-themed Shrinky Dink patterns.
- Name tags: Great for parties, conferences, or classrooms.
- Mini signs: Create miniatures for dollhouses or decorative message boards.
- Bookmarks: Use long, thin designs and add tassels after baking.
- Free Back to School Shrinky Dink Patterns for making back to school more fun and colorful! Or if your kids are into sports, check out these 24 Free Sports Shrinky Dink Patterns.
- 24 Free Thanksgiving Shrinky Dink Patterns
- 24 Free Sports Shrinky Dink Patterns

Tips for Working with Kids
Shrinky Dinks are a fantastic craft for children, but a few safety tips go a long way. Always supervise kids during the baking process. Make sure an adult handles the oven and hot trays if the kids are younger. Let kids focus on the drawing and coloring while you manage cutting and baking.
Pre-cut shapes and let younger children decorate with stickers, stamps, or stencils. Offer templates for those who might not feel confident drawing freehand. Keep projects short and simple for little ones to keep them engaged.
Common Problems and How to Fix Them
Even seasoned crafters run into occasional Shrinky Dink hiccups. Here are a few common issues and how to avoid or fix them:
- Curling and sticking: If your design curls and sticks to itself, place another layer of parchment paper on top before baking. You can also flatten warm pieces with a spatula as soon as they come out of the oven.
- Colors changing: Test your coloring materials first. Some colors may darken or shift when heated. Always color boldly to avoid washed-out results.
- Unwanted shine: If your frosted piece becomes too glossy, use a matte spray sealer to restore a subtle finish.
- Missing the hole: If you forget to punch a hole before baking, use glue to attach a bail or hardware afterward—drilling holes post-bake can cause cracks.
Storing and Organizing Your Supplies
To keep your Shrinky Dink crafting easy and fun, it helps to store your supplies well. Keep sheets flat in a file folder or plastic sleeve to prevent curling. Use small bins or drawers to organize markers, colored pencils, scissors, and hole punches.
Store finished pieces in labeled containers, especially if you’re using them for jewelry-making or mixed media projects. Label the type of plastic if you’re using more than one kind to avoid confusion. Keeping everything organized will make it easier to jump into a new project any time inspiration strikes.
Enjoy the Magic of Shrinky Dinks
Shrinky Dinks are more than just a throwback craft, they’re a versatile and delightful way to express creativity. With just a few basic supplies, you can turn simple sketches into durable, eye-catching miniatures that are perfect for gifts, decorations, or keepsakes.
Shrinky Dinks offer a satisfying transformation process that never loses its charm. Once you’ve mastered the basics, you can experiment with layers, textures, and even 3D shapes to take your crafting to the next level.