Handprint Pumpkin Craft Activity for Preschoolers
This page may contain affiliate links. Learn More.
Fall activities are a must for fun, and what better way to welcome fall than with this simple and adorable Handprint Pumpkin Craft?

Fall is the perfect time to dive into festive, hands-on activities that spark creativity in preschoolers while encouraging fine motor skills, sensory engagement, and seasonal learning. This activity becomes a precious keepsake that families will treasure. Preschoolers love seeing their handprints turned into artwork, and this project adds a personal twist to a classic pumpkin craft. It’s the perfect addition to your celebration of special days and holidays with your daycare kids.
Preschool-aged children (typically 3 to 5 years old) are in a crucial stage of developing their hand strength, coordination, and ability to follow simple directions. Craft activities that include tracing, cutting, gluing, and drawing help strengthen all of these skills in a fun and engaging way. Plus, the fall theme connects children with seasonal traditions and the natural changes happening around them.
I usually prefer process art over crafts, but it’s fun to have handprint keepsakes later in life AND kids do need to learn to follow directions before school, so it’s good practice now and then.

Supplies Needed For Handprint Pumpkin
To get started, gather the following materials:
- Cardstock – orange and two different shades of green
- Markers – black and green
- Glue – school glue or a glue stick
- Scissors – child-safe for little ones

These materials are budget-friendly and easy to find in most daycare craft supplies. If you’re like me, or most daycare providers, you probably already have them on hand. Cardstock works better than construction paper because it’s sturdy and holds up well, even when glue is added. If all you have is construction paper, give it a go.

This craft can be done in under 15 minutes, making it ideal for young attention spans.
Handprint Pumpkin Craft
Ingredients
- Cardstock – orange and two different shades of green
- Markers – black and green
- Glue
- Scissors
Instructions
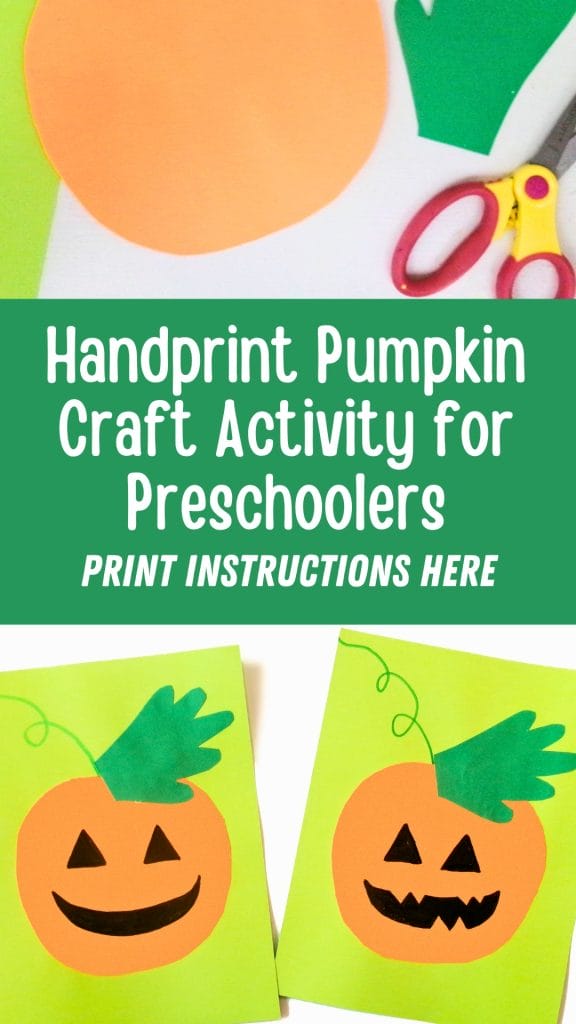
- Start by helping each child place one hand flat on the lighter shade of green cardstock. Using a pencil or marker, trace around the child’s hand to create an outline.
- Assist the child in cutting out their traced handprint. For younger children who haven’t mastered scissor use, an adult can do this step, or the child can help guide the scissors with support. This green handprint will become the leafy stem of the pumpkin.
- Next, take a piece of orange cardstock and cut a large circle or pumpkin-like shape. It doesn’t have to be perfect, organic shapes look great and give each project personality. You can pre-cut these for younger children or allow older preschoolers to try cutting them with guidance.
- Grab the second shade of green cardstock to use as the background for the craft. This color contrast helps the orange pumpkin and handprint “pop” visually.
- Glue the orange pumpkin shape onto the center of the green background paper. Then, glue the green handprint to the top of the pumpkin so that the fingers stick upward like leaves or a stem.
- Using a black marker (Sharpies or paint pens work great for this), help the child draw a face on the pumpkin. They can go traditional with triangle eyes and a toothy grin, or get silly and creative. This is a great chance to talk about emotions, ask how their pumpkin feels and why!
- Finally, hand the child a green marker and encourage them to draw a curly vine coming from the pumpkin’s stem and trailing off the page.
Tips for Success
- Work in small groups so each child gets one-on-one help with tracing and cutting if they need it. My kids are ages 2-4 so they usually need lots of help cutting.
- Use washable markers when working with younger children to avoid stains.
- For added dimension, use foam stickers or googly eyes in place of drawn-on facial features.
- If you’re short on time, consider pre-cutting the orange pumpkin shapes and handprint templates for faster assembly.
Handprint Crafts
For more ideas with kid’s handprints, check out these adorable ideas:
- Make these Cute Turkey Handprint Craft with Kids ideas for Thanksgiving fun.
- Our super fun Handprint Bat Craft Activity for Preschoolers are a great idea for Halloween!
- Grab your shrink plastic and make these Shrinky Dink Handprint Keychains for a keepsake that you can take on the go.
Educational Extensions
This craft isn’t just fun, it also reinforces several preschool learning objectives:
1. Fine Motor Development
Cutting, gluing, tracing, and drawing all help build the small muscles in the hands and fingers that are critical for writing later on.
2. Color Recognition
Children can identify and compare the different shades of green and orange used in the craft.
3. Shape and Pattern Recognition
Talk about the shapes of the eyes and mouth they draw. Ask, “What shape are the eyes?” or “Can you make a pattern with your vine?”
4. Language and Communication
Use the activity to introduce fall-related vocabulary like “harvest,” “vine,” “stem,” “leaf,” and “pumpkin.” Prompt the children to describe their pumpkin faces, Are they happy? Silly? Spooky?
5. Seasonal Science
Tie the craft into a simple lesson about how pumpkins grow. You could show photos or bring in a small real pumpkin for kids to touch, smell, and explore.
Once the pumpkins are finished and dry, they make a charming fall display for your classroom. Consider creating a “Pumpkin Patch” bulletin board or wall where all the handprint pumpkins can be featured together. This not only celebrates each child’s work but also creates a warm, seasonal atmosphere.
Families love keepsake crafts that feature their child’s handprint, and this is a sweet, personal reminder of how small their little ones once were.
Variations to Try
- Add a poem about pumpkins or fall next to the craft.
- Make jack-o-lanterns instead of regular pumpkins by using black paper cutouts for the face.
- Add glitter glue vines for a sparkly touch.
- For Halloween, encourage children to make their pumpkin face spooky or funny instead of just smiling.
Halloween Ideas
For more ideas for Halloween, check these out:
- This Halloween Veggie Skeleton is fun and spooky for your fall get together.
- Halloween Shrinky Dink Patterns make a fun craft that everyone will love.
- Try some of these Homemade Halloween Costumes with Stuff from Around the House to put together a look without having to buy a costume.


