

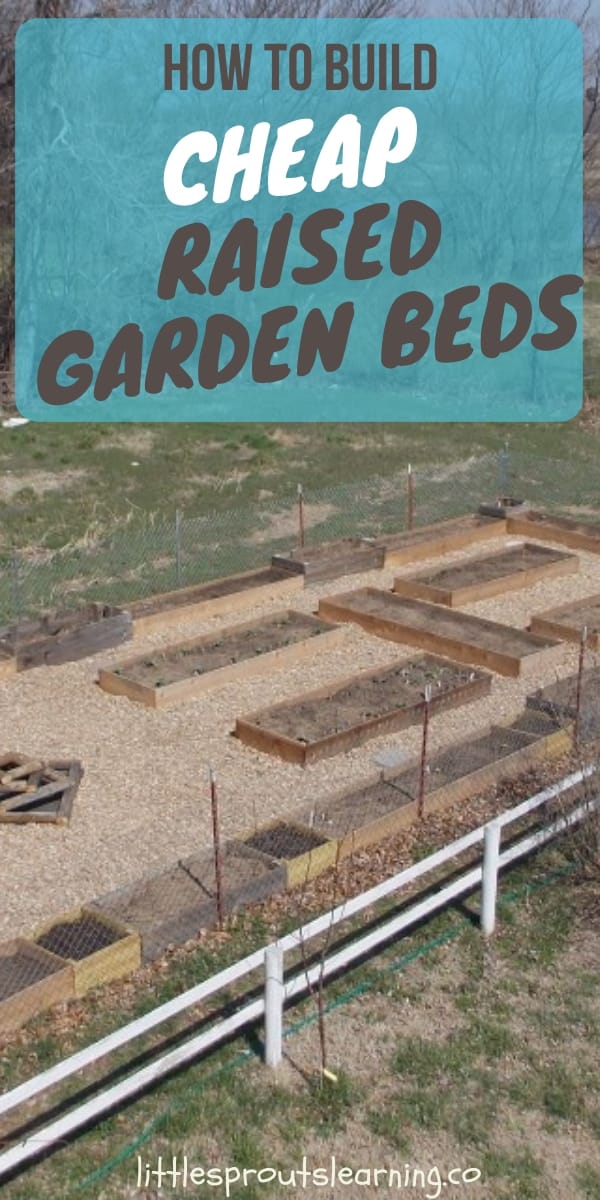
How to Build Cheap Raised Garden Beds on a Budget (Using Reclaimed Materials)
This page may contain affiliate links. Learn More.
How to build cheap raised garden beds on a budget, using free materials, community help, and simple planning. When we expanded our preschool garden at Little Sprouts, we didn’t have a big budget, but we did have creativity, determination, and a village of helpers. Here’s how we built a large, productive raised bed garden without spending a fortune.
The minute my husband told me our generous neighbor was going to allow us to grow whatever we wanted, my mind started spinning one hundred miles an hour. This could really help us reach our goal of growing a lot of our own food.
Consider food for a family of 10, since I have 7 extra kids here for 15 meals a week. The kids and I dreamed of all the things we could try and things we didn’t have room for now, like corn! Yummm!
One thing I was interested in was growing more perennials in our raised beds, like garlic, or crops like potatoes that you harvest all at once, so we would be able to manage what we were growing.
If you’re new to gardening, check out our guide to Gardening for Beginners for simple tips to get started.
Click here to see the benefits of raised garden beds.

Materials We Used for Our Budget Raised Garden Beds
- Reclaimed privacy fence panels
- Used chain link fencing
- T-posts and corner posts
- Concrete
- Landscaping fabric
- Garden soil
- River gravel
- Recycled lumber and pallets
How We Planned Our Cheap Raised Garden Bed Garden
The first thing I did was call my DHS licensing worker to see what parameters I would need to follow for a preschool garden. She told me I needed to have it fenced in, and I would have to be able to bring all the kids in, close the gate, work in there, and bring all the kids out.
Then I needed a sturdy 4-foot fence with no holes the kids could climb through. OK. So, no, I can’t use the barbed wire that is already there? NO! OK. (I was just kidding, of course) That’s not so hard, fencing in whatever space I want to use. But oh, we don’t have any money. Ok, Facebook, who has some old fence lying around? We had to consider that some of the
We had to consider that some of the areas next to our households A LOT of water for most of the spring, and we needed easy access from our backyard or our front yard.
We needed to leave space for a vehicle to drive through so the owner could get his tractor through there or his truck, or whatever he wanted. The part of the space next to our house is very long and narrow, so the preschool garden was going to be long and narrow.
I measured off what I thought was the most I could take care of. I made a spreadsheet and penciled in what beds I thought would fit. I wanted to put narrow raised beds on the fence line so I could use it for a trellis.
How to build raised garden beds cheaply
I decided to build a few cheap raised beds each year until I filled them. The area from the front of my front yard to the gate in the backyard is 80 feet, and we could go 20 feet wide and fit in 2-foot and 3-foot wide beds and still leave space on the side for vehicles.
We decided to do 80 x 20. According to my spreadsheet, we could fit 40 beds ranging in size from 2 x 2 to 3 x 10 and a few containers. Originally, my plan was for all of the raised beds to be 10 feet long and either 2 feet wide up against the fence, or 3 feet wide in the center, with one 4 x 4 as part of the center feature and a place to rest.

I posted on Facebook, and my husband started talking to people at work about our idea. He had a friend who was cleaning up his yard and had a bunch of old wood and chain link he was taking to the dump the following day. Bring it on over.
As I mentioned before, there was some barbed wire fencing on the space, most of which was lying over and broken. There was about 60 feet along one side that was still standing. We removed all of the wire and wound it up so our neighbor could scrap it with other metal, and we set to work on getting the t-posts out of the ground.
We waited until a good rain and went out and worked them out of the ground. We also found a few posts lying around in other places and a little wire we picked up. My husband got the mower out there and mowed the grass and weeds down so we could work more easily.
Raised garden bed ideas, inexpensive
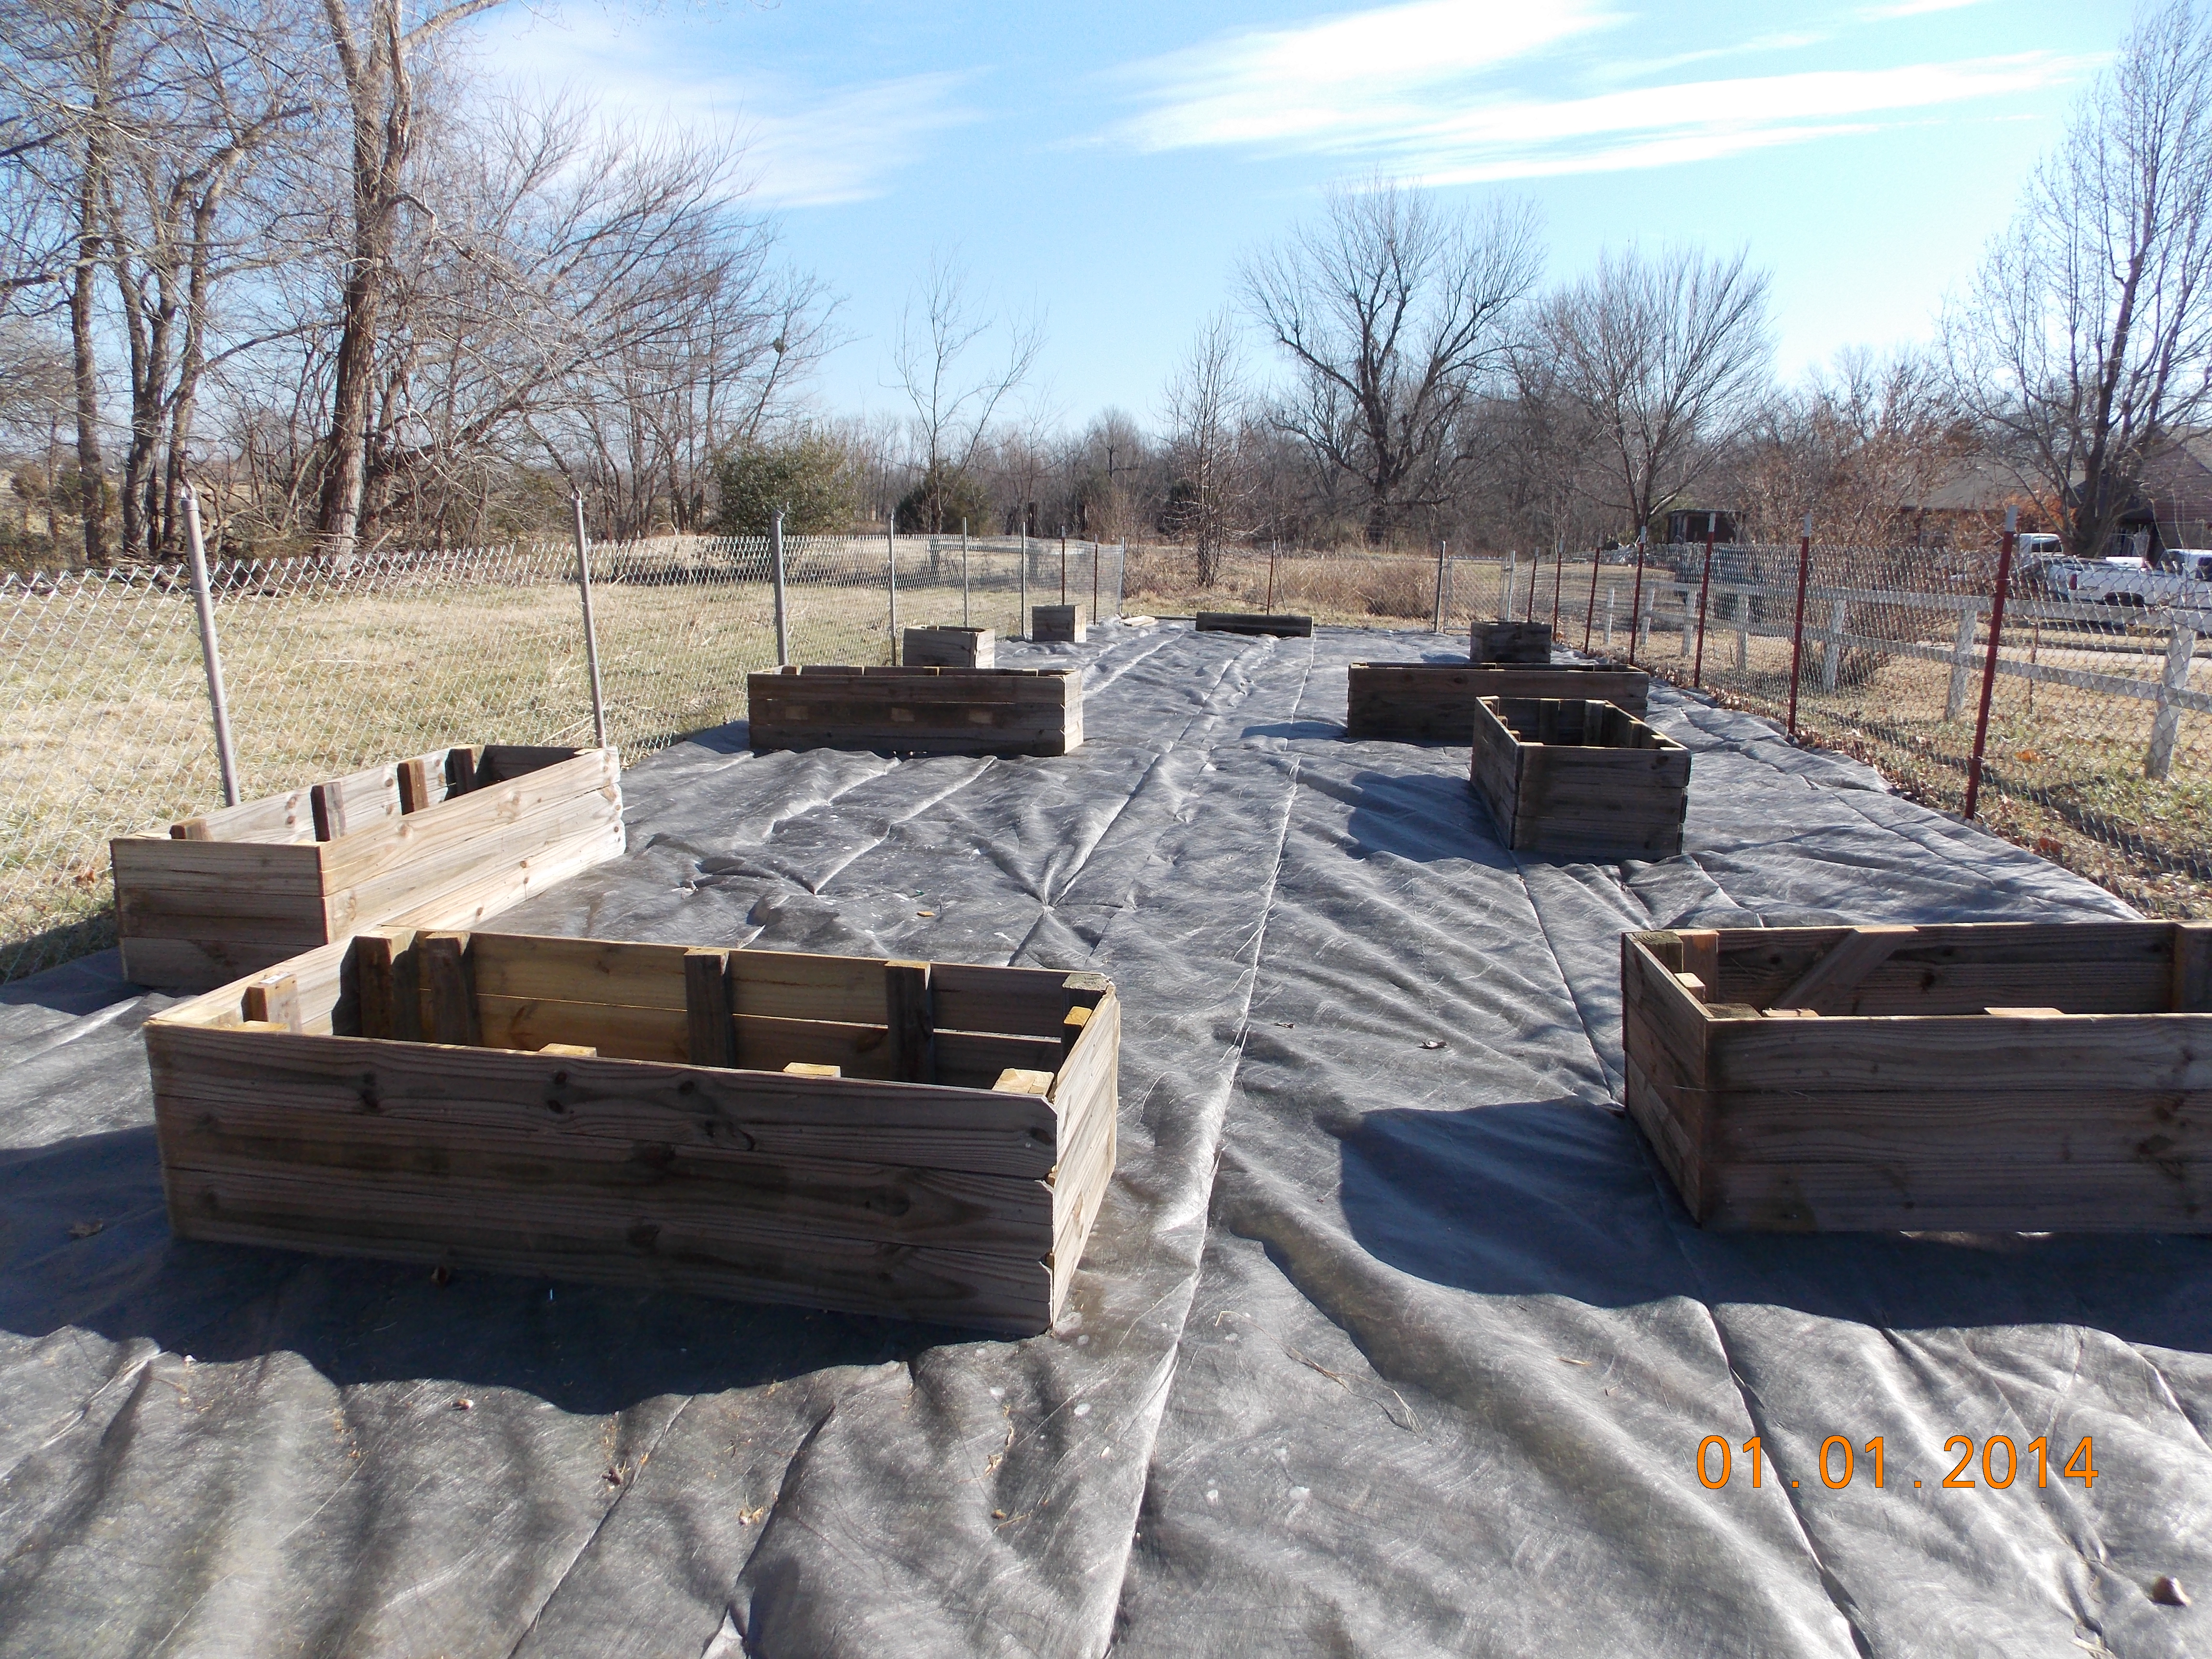
We went to Lowe’s and bought 4 corner posts and bags of concrete. We measured the area as 20 x 80 and dug and set the four posts to mark our area. Then Mr. Kent’s friend Jason came over with his load for the dump. There was quite a bit of privacy fencing….we could cut that up and build cheap raised beds out of it. There was also about 50 feet of chain link and some posts.
We ran string along the four posts and banged in the t-posts we had found every 8 feet, and then we took the posts that were in the junk pile and set those in along another side every 8 feet. We used the hardware that was still on the roll of fencing and strung the back 20 feet side up with that, and rolled the rest up until we could get some more chain link. We had one side of a preschool garden!

Next, we got out our trusty old hand saw and started cutting the privacy fence panels into three slat-wide pieces. They are six-inch slats, so that makes them about a foot and a half tall when made into a cheap raised bed.
They were different lengths but mostly around 6 feet long. Our neighbor was outside and heard us sawing and came over. Do I hear a hand saw? He asked. Yes. Do you want a real saw? Yes. So he brought his saw over for us to use and it made the work much less labor-intensive. Steve is always helping us out.
We laid the panels out in sets that would build a cheap raised bed and started cutting some of the panels into two-foot lengths so we could make the sides of the raised beds. It ended up making 8-6-foot beds, 2-2 footbeds, and a giant bin to hold leaves for composting. Not bad for free!
We were short a few fence posts, so we used a large piece of the top bar that was in the junk pile, cut into pieces to make the last posts we needed. The junk pile had 2 corner posts and one gate in it. We used the posts to frame the gates.
Another friend, Sherrill, saw my post on Facebook and brought us a couple of rolls of used chain link as well. We used it to string one of the long sides of the garden with some hardware that another friend, Suzanne, gave us, and rolled up the rest to use with the leftover from the junk pile. We also found wood in the junk pile to make braces for the privacy fence beds to hold them together. We had a good start.
My plan was to build the 10-foot cheap raised beds from 1 x 12-inch cedar planks. Danny had built our first bed out of them, and it was doing great, so we kept building with them. Click here to see our original garden area.
Ways to Save Money When Building Raised Garden Beds
Before we started building, we looked for every possible way to reduce costs. Here are some of the biggest money-saving strategies that worked for us:
- Ask friends and neighbors for leftover building materials
- Check Facebook community groups
- Use reclaimed fence panels and lumber
- Apply for local grants
- Ask businesses for donations or discounts
- Use crowdfunding to cover larger expenses
- Build a few beds each year instead of all at once
How We Funded Our Raised Garden Bed Project
The supplies for 40 new raised beds were way out of our price range, so we needed some funding. Mr. Kent and I wrote a letter to some local businesses we thought would care about teaching kids and healthy living. We mailed out 40 letters.
A couple of weeks later, Mr. Kent started going door to door to talk to the owners of the businesses about donating. We also contacted the newspaper and asked them to do an article. Most of the companies said no because we are not a public school or a non-profit, so the donations are not tax-deductible. The paper gave no response, so I contacted a different person there, but still no response.
There are grants for school gardens as well.
A few businesses gave us some money to get started. We got donations from Dr. Weaver, Advantage Control, and Dr. Hoos. We bought the last roll of chain link we needed, a gate, and enough landscaping fabric to line the whole space, plus each bed for double protection. Mr. Kent insisted.
Mr. Kent is my husband, my soul mate, and my biggest supporter. I would have NONE of this without him. His support and super hard work help me with everything in my life. I call him Mr. Kent because we are children’s pastors and have a daycare in our home, and we are ALWAYS with kids, so after years of calling him that, it just stuck. Anyway, back to the first supply run, Mr. Kent had gone to
Anyway, back to the first supply run, Mr. Kent had gone to Orchelen’s farm and home to ask for a donation, and they said they couldn’t donate, but anything we bought for the project would be 20% off. They also said they had boxes of seeds we could have they didn’t sell the year before. He loaded them up and brought them to me.
There were 5 HUGE boxes, over 2000 packets of seeds! What did we do with them? We sorted them and took out whatever we thought we could use, and then we made 5 big mixed boxes for the 5 community gardens in town.
As we were looking for funding and mostly being turned down, my friend Jason suggested crowdfunding on the internet. We did some research and started a campaign with Indiegogo for three months.
Most of my daycare parents contributed, and some family members and even a few strangers. We raised enough money for the dirt to fill the beds and some type of material to put between the beds to keep us out of the mud while we work and to keep down the weeds.
Cheap garden beds
Another daycare dad, Dustin, had a bunch of leftover ends from fence planks that he cut off and some decking. He asked if we wanted them. Of course! There were enough planks to build 10, 2 x 2 raised beds. That saved us from having to get cedar for 2 of the long beds, and more money was saved.
During the time we were going door to door and running our Indiegogo campaign, I also sent letters to online garden companies and wrote any garden grants I could find. Most of them turned me down for the same reasons that the local businesses did, not a non-profit or public school.
It doesn’t seem fair to me that barely a profit is not a non-profit, but that’s the breaks. Then it happened. I got the call. I received a grant of $800 for wood from the Oklahoma Environmental Education Committee.
That was the rest of the funding I needed to make our dreams come true. I could buy ALL the wood to build ALL the raised beds if I used some of my Indiegogo money with it. We were so excited!
I called around to find the best price on the wood, and we found a local Hughes Lumberyard here in town that would cut all the wood for us and deliver it for free. Plus, they gave me a deal for buying it all at once and took a few cents off per plank to help us with the project. I would recommend everyone in town to buy wood from them!
Over the course of a month or two, Mr. Kent and I put together all 40 of the raised beds of privacy fence, 10-foot planks, and 2-foot planks. We had been working all winter on these beds, and spring was getting nearer.
We left a space in the center of the garden to make a place of rest. As we were looking at what was left in the junk pile, we had quite a few landscape timbers. I had gotten a book from my daughter that had plans for things made out of what you already have, and there was a really cute herb tower made of landscape timbers, I thought would be the perfect use of them.
Our cutting skills leave, well, a lot to be desired. I asked Shane, one of my daycare dads, to cut the timbers into pieces I needed to build the planter, and then all we needed were some long screws. Mr. Kent and I screwed that cheap raised bed together in a snap.
We decided to use some 4 x 4’s to build a pergola on it and top it with a “ladder” made with sticks from a brush pile. It was really fun, and we think it looks awesome. We lined it with fabric, filled it with dirt, and planted herbs in it. Then we put a table and some seats next to it to rest on. We also planted some sweet potato vines in the corners to grow up and make a little shade.


The next thing we needed was dirt to plant in. I called around and looked around at all the prices and sources and chose a Tulsa company called Gemdirt to deliver a load of garden soil. It was a mixture of riverbed dirt and sand, composted manure, and compost. And for tips on how to fill raised garden beds on a budget, check this post out.
I bought the 12 tons that would fit in a truckload, and they dumped them in the yard for us. Then we had the problem of how we would move this massive amount of dirt into the beds. So we had a dirt party and invited families to help on a Saturday.
Shane and Gena showed up with the boys, and in a few hours, we had most of the dirt moved into the beds with wheelbarrows. It was really cumbersome to get the dirt in the beds because the wheelbarrow got stuck on the sides with every dump. Eventually, we got it done. It filled all but 5 of the beds we had.


As we were finishing filling the raised beds, we could see the weeds growing up between them and pressing the landscape fabric upward. We knew we needed to get the material in between the beds to block out the sun as quickly as possible.
I didn’t want to use mulch because of the slope the area is on and the massive rains we get. I figured it would all wash down into the street and cause a big mess, so I needed something heavy. We decided on one-inch river gravel. I ordered a load of that with the last of our money.
Building a preschool garden
We got 15 tons simply because I had ordered a truckload of pea gravel 15 years before for impact material in my play area, and it was 15 tons. I hoped it would be the right amount.
We had two more work parties for the daycare to move gravel, one on a Saturday and one on a weeknight. Cindy and the boys, Julie and the girls, Alesa and her boy, and Stacy and the girls came to help. On Saturday, we filled the new expansion area, and on Thursday evening, we filled the old garden area. We had some gravel leftover, so we filled a flower bed. We probably had maybe 3-4 tons left that we gave away. My daycare parents ROCK!


After the rock was in place, the preschool garden was ready to use. We started planting seeds and seedlings we had grown inside in the cheap raised beds. We have enjoyed it so much and are eating lettuce, radishes, swiss chard, broccoli, herbs, peas, and kohlrabi.
The kids and I are learning SO much! The expansion lets us grow a variety of food, and we feel so blessed to have it! It took half a year of super hard work to build it and a whole community to help, but we did it, and we love it!

- For a video on how to build the garden, click on the highlighted text.
- Find out more about how to build a stepping stone patio here.
- For more DIY backyard projects, click on the highlighted text.
- Check out the world’s most epic beds, the Growing a Greener World raised beds in Georgia.
- And if you’re on a tight budget, check out Budget-Friendly Preschool Garden Setup: How to Start with Little Money.
Final Thoughts on Building Cheap Raised Garden Beds
Building raised garden beds doesn’t have to cost thousands of dollars. By using reclaimed materials, asking for community support, and building in stages, we created a productive preschool garden that continues to provide food, learning opportunities, and lasting memories. If you’re willing to be flexible and resourceful, you can build a thriving raised bed garden on almost any budget.


Great job 🙂
Thanks!
What an inspiring story! I’m so glad you were able to complete your goal and continue the important work of connecting children with the source of their food. I’m sure that it will stick with many of them as they grow and someday have gardens of their own. Plus they learned from your great example on how to achieve a big goal through hard work and community.
Thank you Terri! I’m glad you enjoyed it. When I look back on it, I can hardly believe we did all that.