

How to Make a Homemade Stepping Stone Patio
This page may contain affiliate links. Learn More.
Would you love to have a unique and personal place to hang out in the yard? You can make your own unique homemade stepping stone patio. We handcrafted our diy stepping stone patio, and we LOVE it! It’s a great place to gather. They are also a great addition to a sensory garden for daycare or other children’s groups.
Homemade Stepping Stone Patio
Our homemade stepping stone patio is 10 feet by 30 feet. We built it in 10-foot sections. It took us almost a year to build the entire thing. We made 507 homemade stepping stones. It was a labor of love, and it is wonderful. There are few things as beautiful as this patio, to my eyes. It’s artistic and creative and was as much fun to make as it is to use.

DIY concrete stepping stones
When building our garden back in 2012, we had learned in gardening class that we needed a place to gather. I just have a small concrete patio by the back door, but I wanted something larger that we could really use for working our harvests, cooling off in the shade, and doing projects. Click here to see how we started our garden.

The back of my house is fairly shady. In the morning, the house shades it and in the afternoon, the trees do. There is sun there from around noon to 2-3 in the afternoon most times of the year. Other than that, it was already a shady place. We decided to build a diy stepping stone patio along the back of the house.
Homemade stepping stones with upcycling
We wanted to upcycle in as many projects as possible in the garden area, so we decided to make our own diy stepping stones. So we needed concrete, molds, and something to decorate them with. We were given some empty wine bottles from friends who were not recyclers, so we used the glass to create masterpieces.
We put the bottles in boxes and smashed them up with hammers. Making sure we used protective eyewear and clothing. This is a messy and perilous method. I suggest you find a safer way to break up the glass if you use it. In addition, you have to be super careful about making sure the sharp edges are inside of the concrete so none are exposed.

Personalized stepping stones
We also were given some old rocks, marbles, and tiles that friends were going to throw away. Then we used them in the decoration of the stones as well. Before we started, we had some square stepping stone molds from a craft project I had done with some friends.
We had some stamps to make letters in the concrete. Later my sister brought me some broken pieces of my grandmother’s china to make a few out of. That was super special too.


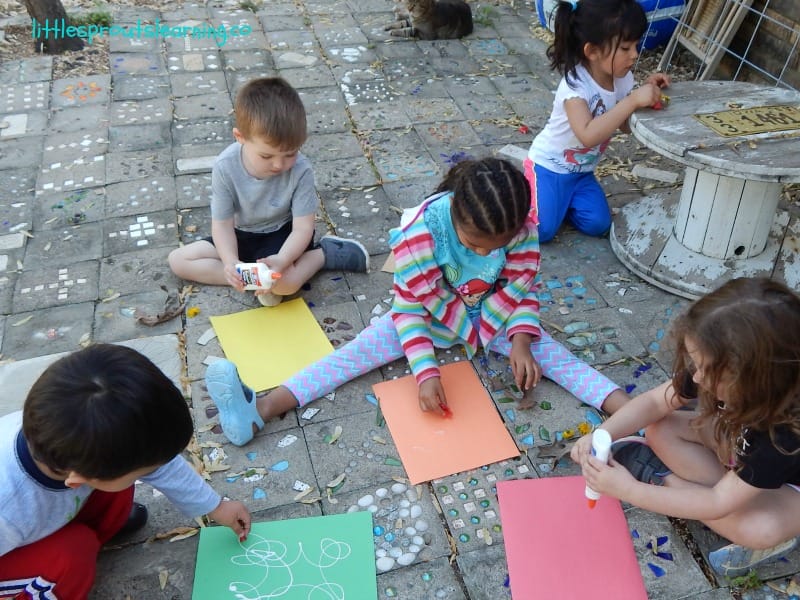
In the first 10-foot homemade patio section, we made the centerpiece handprint stepping stones of everyone in my family, including all my cats. We made stones at family parties, invited daycare parents over to make them, had some friends do a few, and I made them with the kids (not the glass ones, of course). Everyone loved making them. The patio is a super special place, full of love and creativity.
How to make stepping stones with Quickrete
You need molds, Quickrete concrete mix, and decorations. I suggest you get a lot of molds if you are going to make a big patio, because dividing up a big heavy bag of concrete is not super easy. A large 80-pound bag of Quickrete will make 26 of these little 11-inch stones. If you do the 11-inch ones as we did, you need 13 rows of 13 to make one 10-foot by 10-foot pad.
The price for making a homemade stepping stone, although it’s a LOT of manual labor, is far less than buying them. When we made this, it cost us less than 20 cents per stone to make them. That’s a substantial savings.
DIY stepping stones
Dump your Quickrete into a bucket or wheelbarrow, depending on how many of them you are planning to make at a time. We dumped in about 8 cups of water at a time and mixed by hand with a large shovel. Once your concrete mix gets to the consistency of brownie batter, you are ready to go.

DIY stepping stone molds
Plop a few shovels full of concrete into the stepping stone mold and drop it on the table to smooth it out and get out any large air bubbles. Your canvas is ready! Create away. One good tip to remember is that you need to press your decorations far into the concrete, or during the different temperatures, your decorations will loosen and come out.


You need to work quickly, you only have around 20-30 minutes to use all of your concrete before it gets too dry. By the time we finished all of these, we had a system down. My husband would dump the concrete, and I would add water while he mixed. Then he would plop everyone some concrete to get them started and join us in creating.
I’m not going to lie, all of us got tired of making stones before the end of the project. Now, we look back on it fondly, though.

Once you get the design finished, leave your stones on a flat level surface. We used the little slab patio at our back door to line them up on. Don’t disturb them for 24 hours. Then you can pop them out of the mold and leave them in a safe place to cure. It takes about 2 weeks before the concrete is fully cured and won’t break when you step on it.
Another tip is to make sure it’s above 35 degrees, or the stones won’t set. They just turn kind of sandy and fall apart. Once you get enough stones to make the area you want, you need to prepare your space to place them. If you just set them on the grass, they will settle over time and be crooked.
How to make a patio
If you take your time to do the how to make a patio project right, your diy stepping stone patio will stay fairly level. We have had a few tree roots move some of ours, and a few have gotten broken when we were working out there, but only from a serious impact. By the end of the project, we had made a few larger stones as well, and we had some keepsake homemade stepping stones that had been given to us as gifts that we added to the design.

The first thing we did was mark off the area we wanted to use with spray paint. We measured out 11 feet from the house and 11 feet wide. Then we planned to have a 6-inch ring of pea gravel around the outside edge. We did one 10-foot section at a time.
Next, we dug out the grass and down to 4 inches to make the trench for the patio. The stones are about an inch thick. We took a straight shovel and dug it as flat as we could.

Patio stepping stones
Then we attached our level to a 10-foot 2 x 4 and raked it back and forth over the ground to make sure we had as flat a surface as we could. We took a sand tamper and tamped the whole patio area as flat as possible.

Next, we added 2 inches of gravel. This was about 1-inch gravel. We took our level board and raked it level again. Then we added an inch of sand over the top of everything, working it down into the spaces between the gravel. We used a broom and water from the hose to work it in. Then we used our level board to rake it flat and tamped it with our tamper over and over again until the sand was tight in the hole.

It took months, so we used a big tarp to cover the sand so the cats or kids wouldn’t dig it up once we had it level, and then we could add each homemade stepping stone as they were cured.
DIY stone patio
Once we had it tamped as tight as possible with our tamper and as level as possible, we started adding homemade stepping stones from the middle out. We repeated this until it was 10 x 10 and then we added small pea gravel around the edges on three sides.


How to make a stone patio
Once you have the stones in place in your DIY stone patio, you need to dump several bags of sand on the top of the patio. We did about 4 per section. Then work the sand into the cracks of the patio. This forms a mortar-like bond that keeps the stones from wiggling around. This worked great for us.
The only stones that move are the ones that tree roots have pushed out of their places. Boo for tree roots! Once we had this done, we repeated this process two more times until we had the entire thing done.

How to make a patio using stepping stones
The most important thing to remember is to make sure you take the time to make everything level, and you will have a beautiful, homemade stepping stone patio to cherish for years to come. This was one of the most meaningful and fun things I’ve ever made, and it will last a long, long time. I hope you make one for your yard!
Don’t forget to pin for later.


Any idea where I can find the square molds? I’m just making one square to fill in an 11″ hole in my concrete slab that was used to access the electricity for our long-ago-removed hot tub.
You can get an 11 inch one on amazon. https://amzn.to/33PENl8 I have also seen square ones at hobby lobby, but I think they had 8 inch and 12 inch.
I love your patio. You said that you used 8 cups of water in the cement mix. Did you use 80 lbs of the quickcrete at a time and make 26 molds at once? You said each 80 lb bag makes 26 squares and you made 13×13 for a 10×10 area. so, I would like to do something like this, but I think 20 minutes to set would not be enough time to decorate 26 squares by myself. What would you recommend for the mix?
no, we didn’t use the whole 80 pounds at once. I think we used about 1/2 a bag, so I would say if you can do 1/4 of a bag and decorate 13, you could do it. It’s hard to measure out the concrete because it’s heavy, but maybe you could get an 8 cup measure and scoop out that much concrete and experiment how much water it takes to make it like brownie batter and then you can repeat that. I bet that would make at least 2 at a time. Then you could just set the bag up and scoop out of it like flour (that scratches your hands all up). I can’t wait to see what you make!
Last fall I began such a project around a fire pit. (at a new home, in the country) Round is not going to be very easy, anyway because if snow and cold, the project now waits to spring. I have gleaned many pointers from reading about your creation. Thank-you.
You’re so welcome. I know you will enjoy it!
Unique padio….sounds fun. Thanx for sharing.
Thanks so much and thanks for checking it out!
This is nothing short of wonderful and magical. Bless you all for sharing it with us. I want to do tis. I’ve only made individual pavers, which was a lot of fun, but this would really dress up the place for sure!
Even years later, we still love it! It’s a wonderful place to be. I definitely think you should try. Thanks for checking it out!
Your kitty looks so cute sitting out on the patio–it must be so happy when the stones warm up in the sun! Love how you guys personalized the stones with glass.
Thank you!
Oh my goodness! This is so resourceful and beautiful! Thanks for sharing how you did it, what you’d do differently next time, and what you love about it!
Thanks so much for checking it out!
This is so pretty! What a great idea to make your outdoor space special!
Thank you! I’m glad you like it. 🙂
Great Job !!!
Thank you!